How to redact a screenshot

Cover what you want hidden with a solid block, save the result as a separate file, then open that file and check it. Pixelated text can be turned back into text, software can pick out faces and digits through blur, and one phone's cropping tool once left the cut-off part inside the file.
What to cover
Look at the whole picture before you start, not just the line you had in mind:
Names, email addresses, phone numbers and street addresses.
Account, card and order numbers.
Passwords, keys and tokens, including ones inside a web address.
Browser tabs, bookmarks, notifications and the title bars of other windows.
File names and folder paths.
Why a solid block, and not a blur
A solid block that's saved into the picture takes the place of the pixels under it. The other ways change those pixels and keep some of the original.
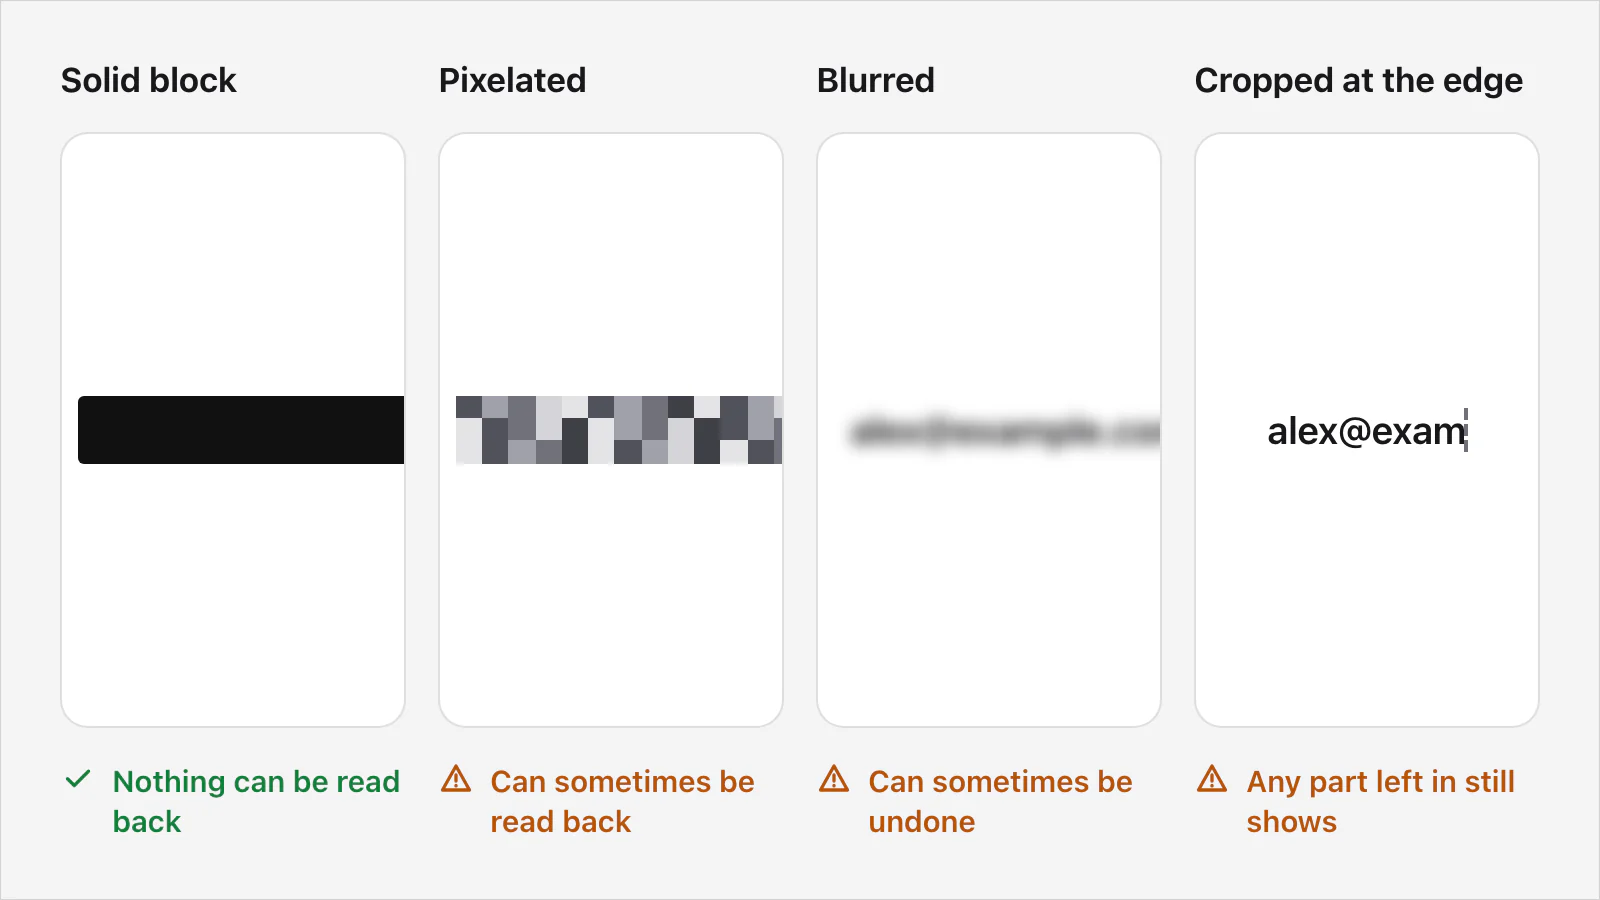
Pixelation can sometimes be reversed. Dan Petro of the security firm Bishop Fox wrote a tool, Unredacter, that turns pixelated text back into readable text. His write-up says the only secure way to redact text is a black bar. Pixelating sets each block to the average colour of the pixels under it, so someone who knows the font and its size can try letters until one matches.
Blur and pixelation can give up faces and digits. A 2016 research paper by Richard McPherson, Reza Shokri and Vitaly Shmatikov trained neural networks to identify faces, objects and handwritten digits in pictures hidden by pixelation or blurring.
Cropping isn't always cropping. In March 2023 Google fixed a bug in the screenshot editor on its Pixel phones. A cropped screenshot was written over the original file without trimming it, so the end of the original stayed in the saved file and the cut-off part could be recovered. Google rated it high severity. Crop to lose empty space, not to hide a secret.
A three-step version of the job is how to blur or hide part of a screenshot.
On Windows 11
The Snipping Tool has a redaction tool built in.
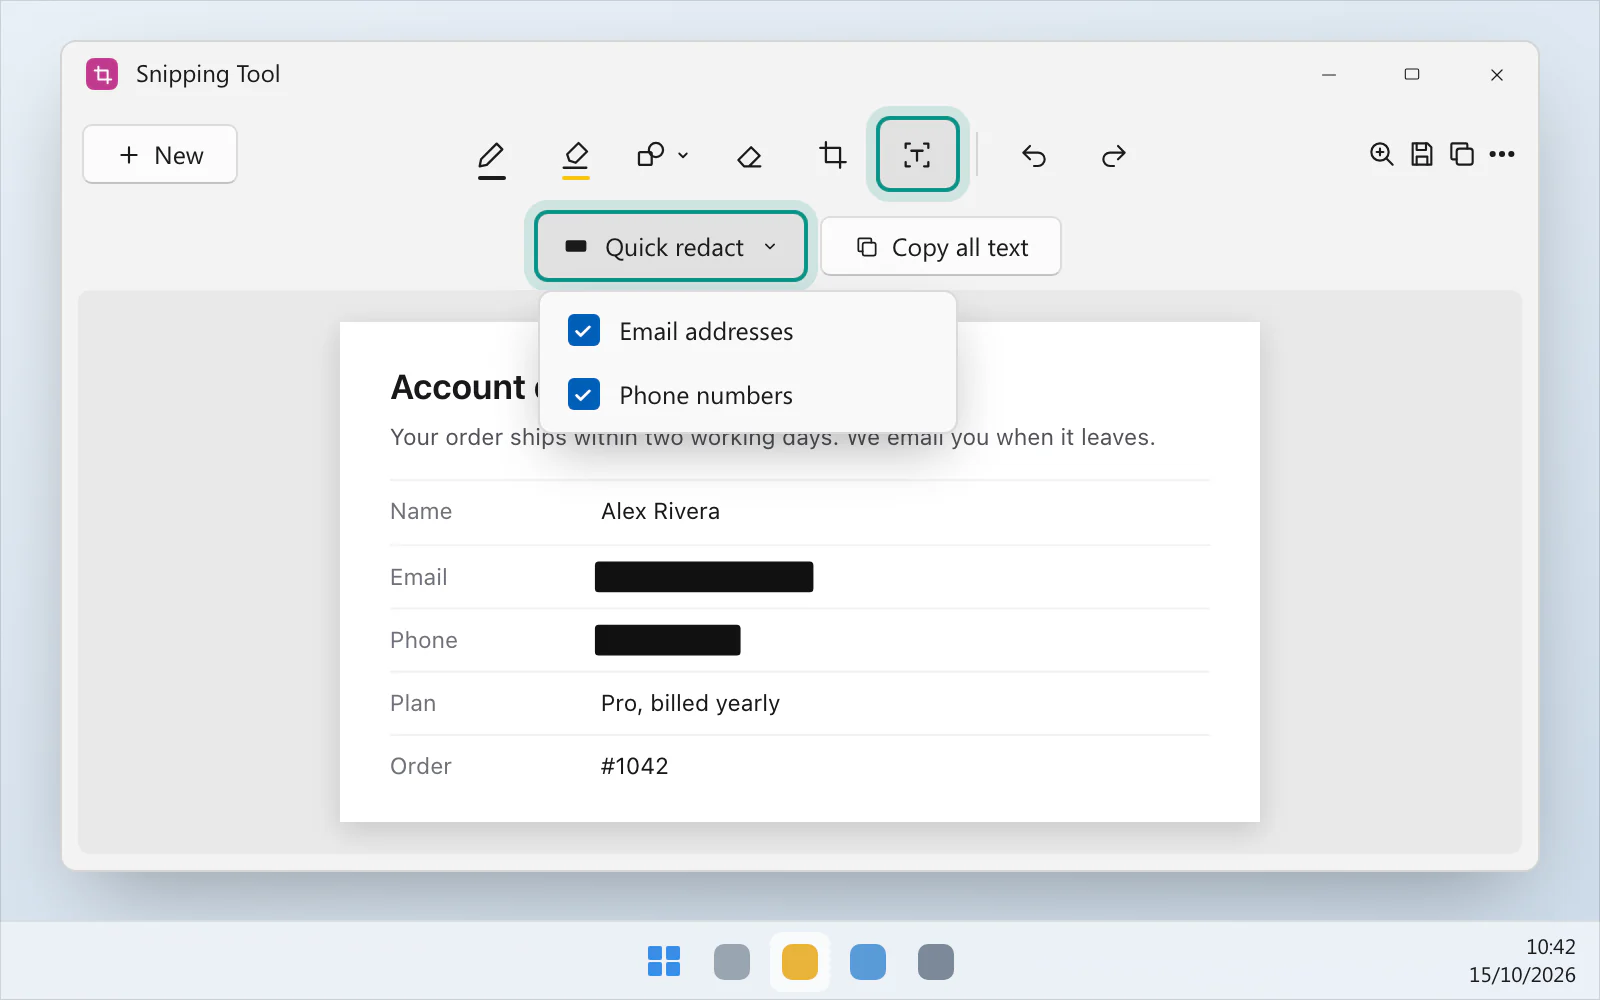
Press Windows keyShiftS, take a snip, then select the notification that appears to open it in the Snipping Tool.
Select Text actions. Microsoft's page on the Snipping Tool says the text is found on your own computer.
Select Quick redact to cover every email address and phone number it finds.
For other words, select them yourself. Microsoft's September 2023 post for Windows Insiders describes a Redact Text choice in the right-click menu, but its support page doesn't list it, so if you don't see it, cover the words with an editor that can draw a solid block.
Read the picture again. Microsoft names email addresses and phone numbers for Quick redact, so names, street addresses and account numbers are yours to cover.
Save the snip.
Microsoft says the Snipping Tool saves each snip to your Screenshots folder as soon as you take it, and it doesn't say whether saving after you redact replaces that file. Look in the folder and delete any copy that isn't redacted. Microsoft also doesn't say how Quick redact changes the saved picture, so check the saved file as the last section describes.
In March 2023 Microsoft published a security advisory for a bug that could leave part of the original image inside an edited file. It says it affected a screenshot that was saved, then edited (cropping is its example) and saved again to the same place. It names the Snipping Tool on Windows 11 (fixed in version 11.2302.20.0) and Snip & Sketch on Windows 10 (fixed in 10.2008.3001.0). Keep the app updated from the Microsoft Store, and still redact before you share rather than trusting an edited copy.
On Windows 10, Microsoft's Snipping Tool page lists a pen, a highlighter and an eraser, and no redaction tool. You'll need an editor that can draw a solid block, such as the redact tool in your browser.
On a Mac
A screenshot or other picture
Work on a copy, so the file you share is clearly the redacted one.
Select the screenshot in the Finder and press CommandD to duplicate it.
Open the copy in Preview.
Click the Show Markup Toolbar button if the toolbar isn't showing.
Click Shapes, choose a shape that covers the text, and drag it into place. Apple's page on annotating an image says the blue handles resize it.
With the shape selected, click Fill Color and choose black. Apple says Fill Color changes the colour used inside a shape.
Choose File › Save. Apple says that once you save an image you can't edit, move or delete its annotations.
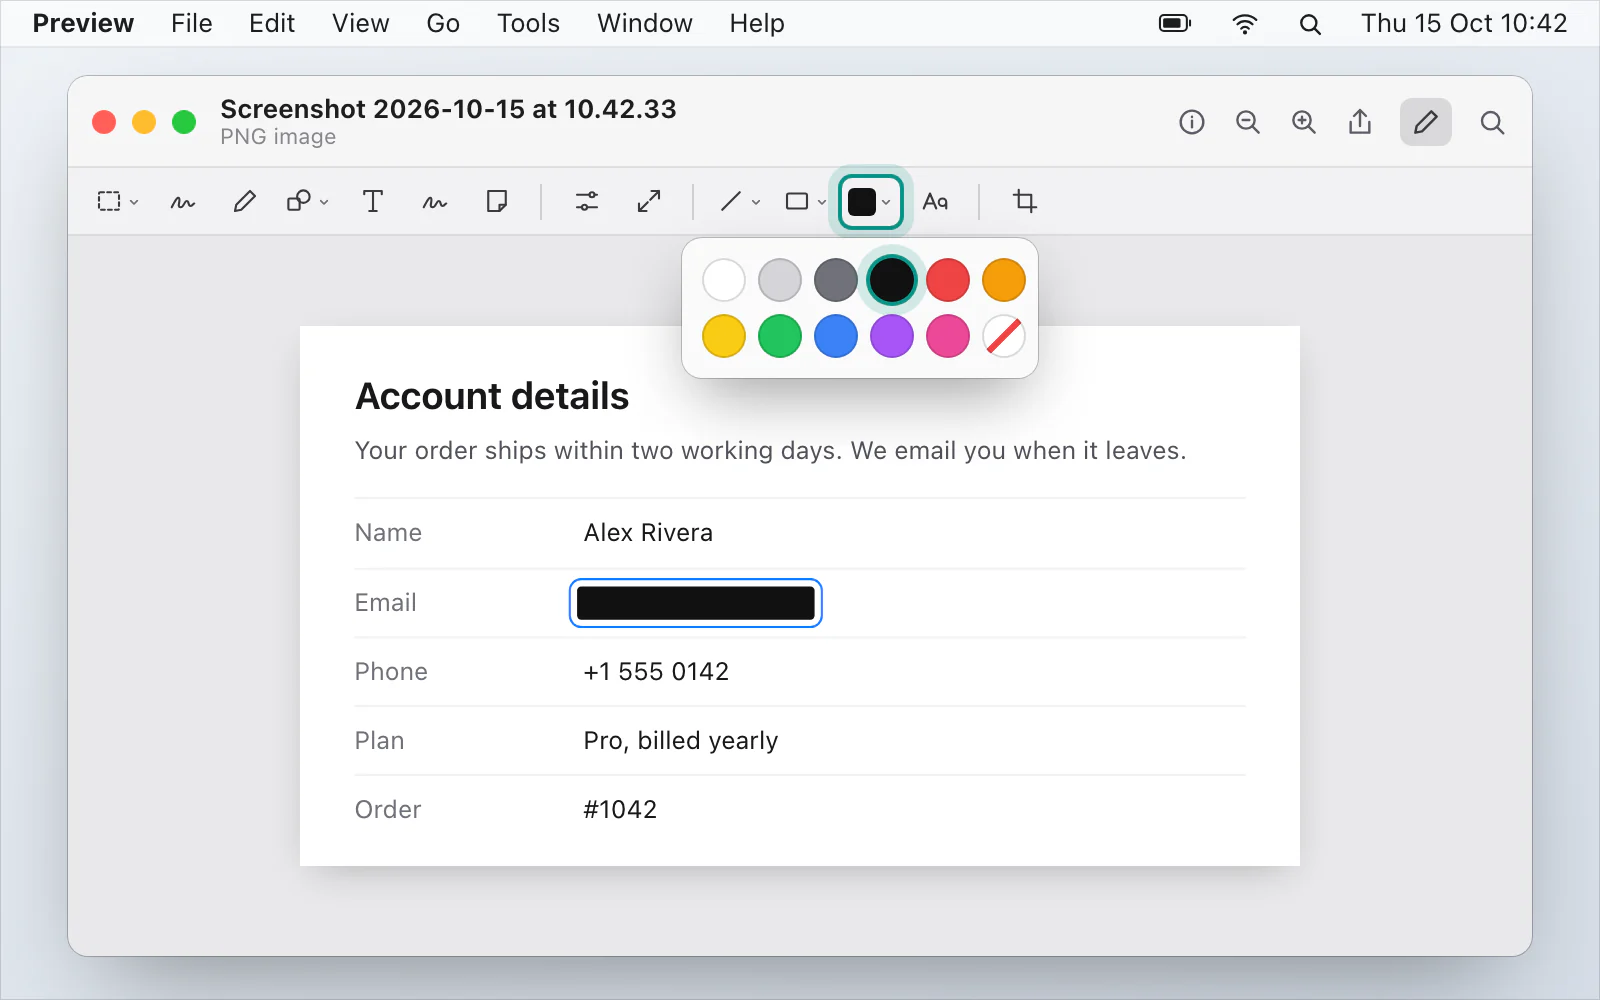
Apple doesn't say whether the pixels under a shape are replaced when you save, so check the saved picture before you send it.
A PDF
Preview's Markup toolbar has Redaction Selection for PDFs. Apple describes it as selecting text to remove it from view. You can change the redaction while you edit, and once you close the document it's permanent, so work on a duplicate, as Apple's page for macOS Sonoma 14 advises. If the PDF has a table of contents, Apple says the entries that link to redacted text aren't removed, so check those too.
Redaction Selection selects text, and Apple doesn't say whether it can select the words in a screenshot that has been saved as a PDF. For a screenshot, use the shape route above. If the screenshot is already a PDF, cover it with a shape and then flatten it: Apple says File › Print, then Save as PDF, flattens annotations so they can't be edited, while File › Save keeps them editable.
In a browser
Nothing to install: the redact tool covers what you drag over with a solid block and downloads the result, and the picture stays in your browser. The pixelate tool is there for softening a busy background, not for anything private.
Check the file before you share it
Open the saved file, not the editor. Zoom in to the actual size and follow the edge of each block. A box that stops at the last letter can leave the tail of a g or a y showing.
Make sure you can't see through it. Use solid black, not a light colour or a see-through highlight.
Look at the rest of the picture. Tabs, notifications, a web address, a file name in a title bar.
Share the redacted file, not the one you started from. If you took the screenshot first and redacted afterwards, the unredacted picture is probably still saved somewhere. Find it and delete it if you don't need it.
If you're unsure how an app saved it, take a fresh screenshot of the finished picture and share that. It holds only what was on the screen.
Check the file's hidden details. A picture file can carry more than the picture. The metadata remover lists what a file holds and makes a clean copy.
Redact in VizShot, if you do it often
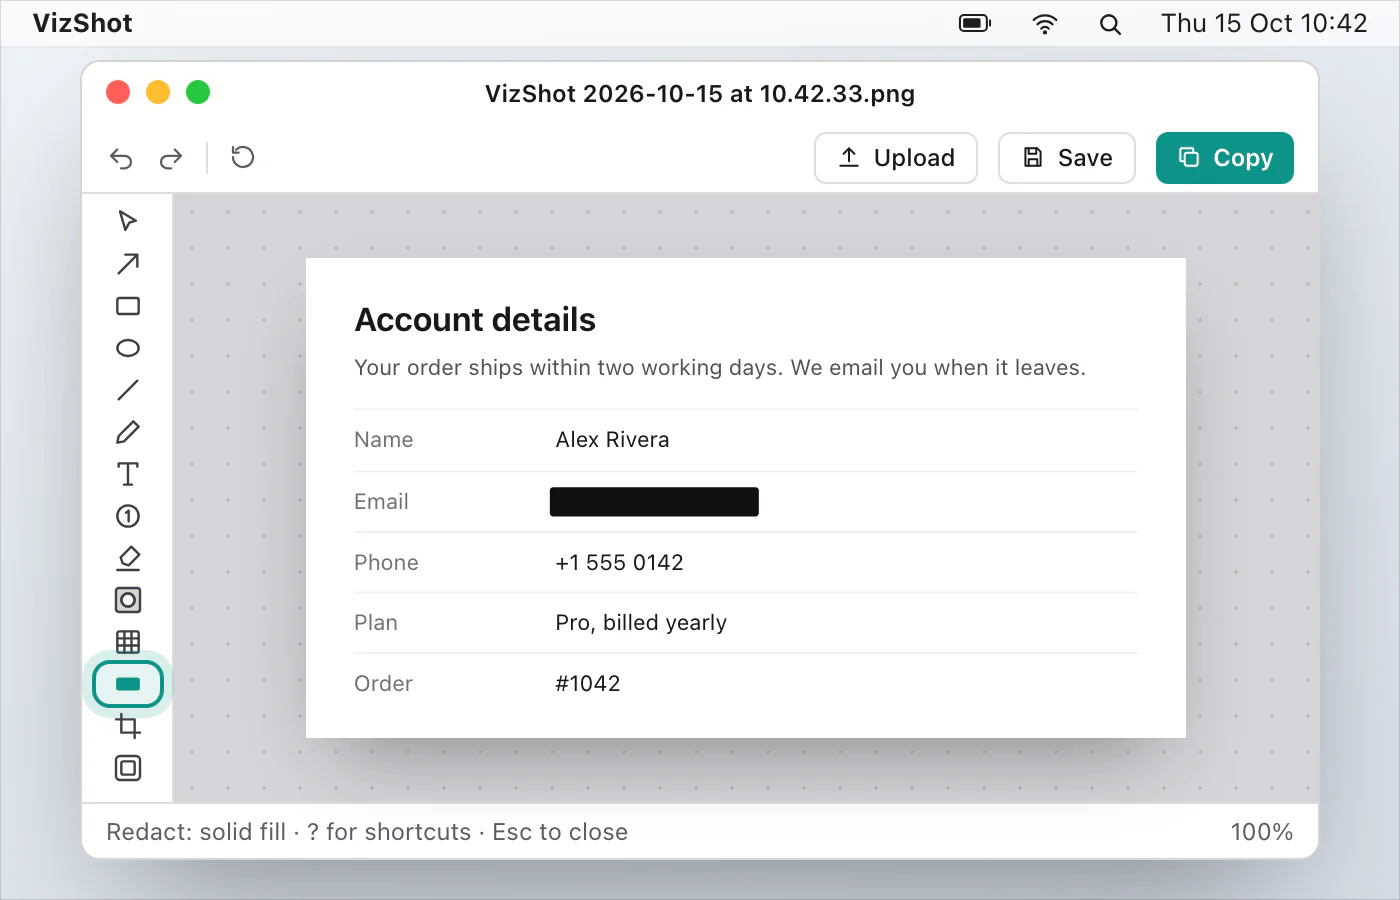
VizShot's editor has Redact (press E), which covers what you drag over with a solid black block, and its help says nothing can be recovered from the picture once you save. Pixelate (B) can sometimes be reversed, the help says, so use Redact for anything private. Marks stay movable until you save. Save writes a new file and leaves the original capture where it was, so share the new one. After the 14-day free trial, saving needs a key, and Copy still works. Redact or pixelate? has the details, and you can download VizShot.
$8, once, for two computers.
Questions
How do I redact a screenshot on Windows 11?
Open the snip in the Snipping Tool, select Text actions, then Quick redact for email addresses and phone numbers. For other words, select them yourself and look for Redact Text in the right-click menu. If it isn't there, use a solid block in another editor. Then check the saved file.
How do I redact a screenshot on a Mac?
Work on a copy. In Preview, draw a shape over the text, set its Fill Color to black and save. For a PDF with text in it, use Redaction Selection. Apple doesn't say what is left under a shape, so check the saved picture.
Is blurring a screenshot enough to hide text?
Not for anything private. Research has shown software picking out faces, objects and handwritten digits through blur and pixelation, and a security firm's tool turns pixelated text back into text. Use a solid block.
Does Quick redact catch everything?
No. Microsoft's page names email addresses and phone numbers. Names, addresses, account numbers and keys are yours to select.
Does cropping a screenshot remove what I cut off?
It should. In March 2023 Google fixed a bug where a cropped Pixel screenshot still held the cut-off part in the saved file, and Microsoft published an advisory for a similar one in the Windows Snipping Tool. If a detail is inside the picture, cover it with a block rather than cropping around it. Cropping a screenshot on a Mac covers cropping itself.
Checked against
- Microsoft: Use Snipping Tool to capture screenshots, read 15 October 2026
- Microsoft: Copy the window or screen contents, read 15 October 2026
- Microsoft: New updates for Snipping Tool and Phone Link begin rolling out to Windows Insiders, read 15 October 2026
- Apple: Annotate an image in Preview on Mac, read 15 October 2026
- Apple: Annotate a PDF in Preview on Mac, read 15 October 2026
- Apple: Annotate a PDF in Preview on Mac, read 15 October 2026
- Apple: Mac keyboard shortcuts, read 15 October 2026
- Bishop Fox: Never Use Text Pixelation To Redact Sensitive Information, read 15 October 2026
- arXiv: [1609.00408] Defeating Image Obfuscation with Deep Learning, read 15 October 2026
- Android: Pixel Update Bulletin, March 2023, read 15 October 2026
- David Buchanan: Exploiting aCropalypse: Recovering Truncated PNGs, read 15 October 2026
- Microsoft: CVE-2023-28303, Windows Snipping Tool Information Disclosure Vulnerability, read 15 October 2026